6109R 'Cheat Sheet'
UUID vs. VPSID / CTID
One of the more ugly differences introduced with OpenVZ 7 is that Containers are no longer just identified by a short VPSID. Instead Containers (and VMs) now use a UUID. The UUID is the new and unique identifier of VPSs and for practical purposes it's much more ungainly:
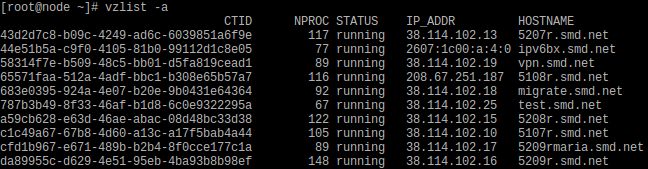
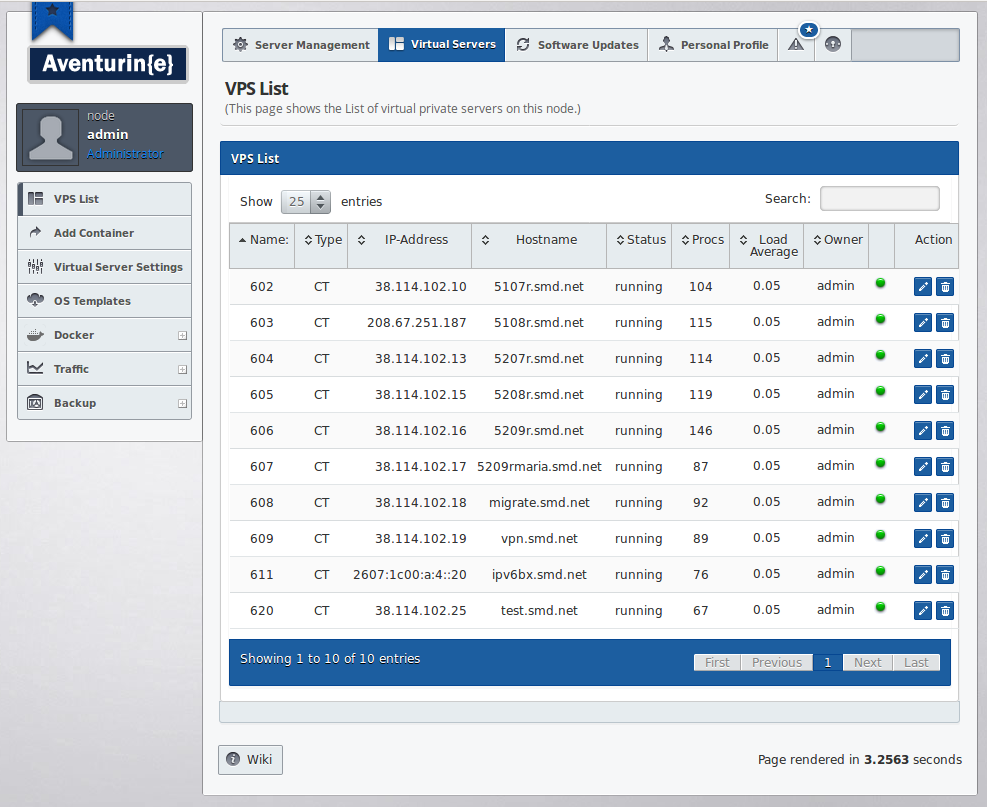
In fact the 'vzlist' and 'vzctl' commands are now (almost) being deprecated and have been superseded by a new command named 'prlctl'. And 'prlctl' shows us more useful information when we want it to show us the VPS list:
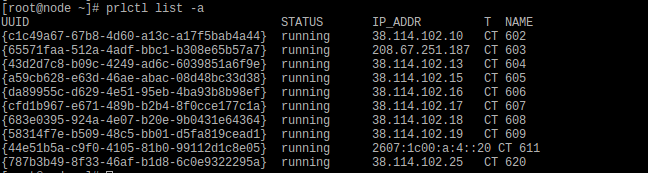
Please note the last column in that table, which says 'NAME'. That's your old VPSID. And in fact you can now execute commands or set parameters by addressing the Container (and VMs) either by their UUID or by their 'NAME'.
The commands shown below are interchangeable and will do the exact same things:
vzctl enter 602
vzctl enter c1c49a67-67b8-4d60-a13c-a17f5bab4a44prlctl enter 602
prlctl enter c1c49a67-67b8-4d60-a13c-a17f5bab4a44
However, you might want to get used to using 'prlctl' for the majority of your CLI oriented tasks as it supports all new features, whereas 'vzlist' will only work for Containers (not VMs) and will also not be able to do some of the more advanced things that 'prlctl' can handle.
A complete overview of the new CLI based commands of OpenVZ 7 and their syntax can be found in the OpenVZ 7 manual. This page here is a good starting point.
Directory Layout & Container File Area Access
Users of OpenVZ 6 (and prior) are used to the VPS config files being located under /etc/vz/conf/ and the VPS file area being located under /vz/private/<VPSID>/. In fact often people used to access /vz/private/<VPSID>/ directly on the node to copy files and folders in or out of a running VPS. With the VPS's using SimFS as filesystem this wasn't much of a deal.
On OpenVZ 7 the introduction of UUIDs (instead of VPSIDs) and the Ploop filesystem for Containers does away with all of that and introduces some noteworthy changes.
First of all: The VPS filearea is now /vz/private/<UUID>/, but there is where the similarity already ends. It's best to symbolize the new layout with a small tree ASCII-grapics:
root@node ~]# tree /vz/private/c1c49a67-67b8-4d60-a13c-a17f5bab4a44/vz/private/c1c49a67-67b8-4d60-a13c-a17f5bab4a44├── dump│ └── Dump.restore│ ├── dump.log│ └── restore.log├── fs├── root.hdd│ ├── DiskDescriptor.xml│ ├── DiskDescriptor.xml.lck│ ├── root.hds│ └── templates├── scripts├── templates -> root.hdd/templates└── ve.conf
7 directories, 6 files
The file ve.conf inside /vz/private/<UUID>/ is your VPS config file. In /etc/vz/conf/ you just have a Symlink in the format of /etc/vz/conf/<UUID>.conf that points to /vz/private/<UUID>/ve.conf.
The directory /vz/private/<UUID>/root.hdd contains the Ploop "disk" of your Container.
So via /vz/private/<UUID>/ you do no longer get direct access to the files and folders of the filesystem of your Container.
How to access the files of a running Container from the Node?
There are two ways:
You can access /vz/root/<UUID>/ instead and can copy, rename or move in the same way as you did before. The usual warnings apply: Be careful what you do.
If you just quickly want to shove a file into the running Container, then that's the way to do it.
If you want to extract files out of the running container (like for your own self-scripted backup method) it's better to use the built in Snapshot functionality. You can use it to create a Snapshot, which is a static carbon copy of the file area of your Container as it was at the moment that the Snapshot was taken. No running processes will interfere with the files in your Snapshot and you can mess around with it in any way or shape as you please. It won't affect the running VPS, which is continuing to run on an instance of the fileareathat's different from the one in the Snapshot.
Creating and mounting a Snapshot of a running Container
1. Create a new temporary UUID:
[root@node ~]# uuidgen
07cf3e8a-628e-4dc4-86d5-aa55853f9a15
2.) Create a Snapshot of your Container:
prlctl snapshot <UUID> --id <temporary-UUID> --skip-suspend
3.) Mount the Snapshot:
prlctl snapshot-mount <UUID> --id <temporary-UUID> --target /mnt
This will mount the Snapshot to /mnt and you can then access the files and folders of the Containers file area under /mnt.
4.) Cleanup:
Once you're done you want to unmount the Snapshot from it's mountpoint /tmp:
prlctl snapshot-umount <UUID> --id <temporary-UUID>
5.) Unless you want to merge the Snapshot back into the Container it would be best to delete the Snapshot as well. You can do so this way:
prlctl snapshot-delete <UUID> --id <temporary-UUID>
That's a quick rundown of how to use Snapshots. More detailed information is available in the OpenVZ 7 manual.
One more thing, though:
We do have a particular client who always uses his own backup mechanism, which neatly ties into his overall architecture. He also likes to use Snapshots for this, so we created a small script as a wrapper for his own backup method. It performs a snapshot, mounts the Snapshot and then executes a command inside the mounted filearea. You can specify the command to execute as a parameter. Once done our script unmounts the Snapshot and deletes it.
/usr/sausalito/sbin/vzpmount.sh usage:-u: Specify UUID of VPS that you want to RSYNC backup-m: Specify directory where you want to temporarily mount Snapshot-s: Specify (in quotes) the backup command you want to run inside the Snapshot area.
Let's demonstrate this in a small example. We just want to run "ls -als" in the mounted Snapshot (instead of doing an Rsync). In that case the command and the results of it would look like this:
[root@node ~]# /usr/sausalito/sbin/vzpmount.sh -u 43d2d7c8-b09c-4249-ad6c-6039851a6f9e -m /mnt/ -s "ls -als"
Starting ...
Mounting VPS-Snapshot with UUID 43d2d7c8-b09c-4249-ad6c-6039851a6f9e to /mnt/
Creating snapshot -4.0E+95Storing /vz/private/43d2d7c8-b09c-4249-ad6c-6039851a6f9e/Snapshots.xml.tmpfreezeCreating image snapshot uuid=-4.0E+95 image=/vz/private/43d2d7c8-b09c-4249-ad6c-6039851a6f9e/root.hddunfreezeSnapshot -4.0E+95 has been successfully createdMount snapshot -4.0E+95Mount image: /vz/private/43d2d7c8-b09c-4249-ad6c-6039851a6f9e/root.hdd ro
Entering /mnt/ and executing "ls -als" ...
insgesamt 10870764 drwxr-xr-x 25 root root 4096 11. Aug 17:50 .4 dr-xr-xr-x. 21 root root 4096 21. Aug 09:14 ..12 -rw------- 1 root root 12288 10. Aug 17:31 aquota.group16 -rw------- 1 root root 13312 10. Aug 17:31 aquota.user0 -rw-r--r-- 1 root root 0 11. Aug 17:50 .autofsck0 -rw-r--r-- 1 root root 0 26. Mär 2014 .autorelabel4 dr-xr-xr-x 2 root root 4096 12. Jul 03:47 bin4 dr-xr-xr-x 4 root root 4096 11. Sep 2012 boot4 drwx------ 2 root root 4096 19. Mai 2015 .cpt_hardlink_dir_a920e4ddc233afddc9fb53d26c3923194 drwxr-xr-x 3 root root 4096 10. Aug 17:26 dev12 drwxr-xr-x 119 root root 12288 21. Aug 18:00 etc4 drwxr-xr-x 21 root root 4096 8. Aug 00:17 home12 dr-xr-xr-x 18 root root 12288 12. Jul 03:47 lib4 drwxr-xr-x 2 root root 4096 5. Jul 2015 log16 drwx------ 2 root root 16384 10. Aug 10:36 lost+found4 drwxr-xr-x 2 root root 4096 20. Jul 2011 media4 drwxr-xr-x 2 root root 4096 20. Jul 2011 mnt4 drwxr-xr-x 3 root root 4096 11. Sep 2012 opt4 dr-xr-xr-x 2 root root 4096 20. Jul 2011 proc4 -rw-r--r-- 1 root root 109 2. Okt 2014 razor-agent.log4 -rw------- 1 root root 1024 5. Jan 2016 .rnd4 dr-xr-x--- 17 root root 4096 11. Aug 17:53 root4 drwxr-xr-x 2 root root 4096 8. Jun 2017 run12 dr-xr-xr-x 2 root root 12288 12. Jul 03:47 sbin4 drwxr-xr-x 2 root root 4096 20. Jul 2011 selinux4 drwxr-xr-x 2 root root 4096 20. Jul 2011 srv4 drwxr-xr-x 2 root root 4096 20. Jul 2011 sys4 drwxrwxrwt 8 root root 4096 21. Aug 18:00 tmp4 drwxr-xr-x 2 root root 4096 19. Jul 2014 trunk4 drwxr-xr-x 18 root root 4096 29. Okt 2014 usr4 drwxr-xr-x 28 root root 4096 31. Okt 2014 var
Umount snapshot -4.0E+95Deleting snapshot -4.0E+95Storing /vz/private/43d2d7c8-b09c-4249-ad6c-6039851a6f9e/Snapshots.xml.tmpDelete image snapshot uuid=-4.0E+95 image=/vz/private/43d2d7c8-b09c-4249-ad6c-6039851a6f9e/root.hddSnapshot -4.0E+95 has been successfully deleted
SUCCESS: All done.
In case you wonder how long that took to execute? Here you go:
real 0m0.327suser 0m0.097ssys 0m0.070s
That's pretty fast, even for doing "just" a Snapshot of a 47GB file area, mounting it, doing an "ls -als", unmounting and then deleting the Snapshot.
Mounting the filearea of a stopped Container
This is much more straightforward.
prlctl stop <UUID>
prlctl mount <UUID>
Once you've done that, you can access the files of the Container's file area under /vz/root/<UUID>/ without worry of running processes doing any interference. When you're done, simply unmount the filearea and restart the VPS:
prlctl umount <UUID>
prlctl start <UUID>
That's it.
OS Templates
In the past (OpenVZ 6 and prior) the OS install into Containers happened via "pre-created" OS Templates. These were basically tarballs of a cleaned up "virgin" copy of whatever OS you wanted to install.
Nowadays OS Templates consist of a set of scripts, some tools and config files. When you create a Container with (for example) a "stock" CentOS-7, then OpenVZ 7 will check /vz/template/centos/7/x86_64/ for the configuration and the tools to build you a "fresh" CentOS-7 from scratch. It'll use the distributions package manager and the distributions RPM command to download and install the desired RPMs. Pre- and Post-install scripts run over the OS that got installed that way to bend it into shape and form for usage with OpenVZ 7. Finally a tarball is created and that is used to install the filearea of your freshly pressed CentOS-7 Container.
The tarball is kept around in the cache and may be used again to build future CentOS-7 Containers. But if there are YUM updates released that aren't yet included, it'll fetch and install these updates, too.
These OS templates can be managed via the 'vzpkg' CLI command. But you can also use the Aventurin{e} 6109R GUI to download the environments of additional OS templates and can manually (via the GUI) refresh the OS template cache for individual OS templates.
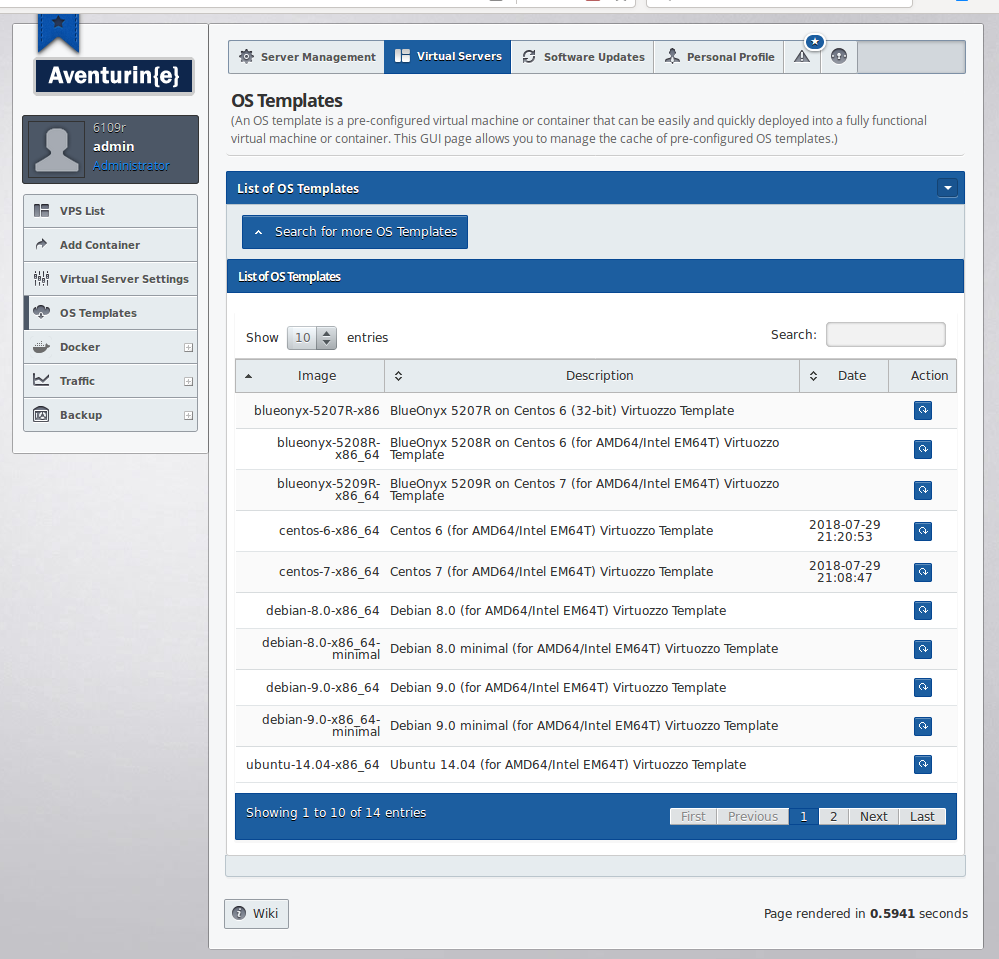
A click on the button next to a listed OS template will refresh the cache and will make sure that future deployments of Containers from said OS template go faster.
Aventurin{e} Backups
First of all: Backups taken on a 6108R are NOT compatible with 6109R. So once you migrate to 6109R you also will want to make sure that (once your VPS's are imported) that you configure the new built in backup again. The GUI pages for that haven't changed, but "under the hood" are indeed some differences:
The cronjob that performs the local and/or remote backup still calls the script /usr/sausalito/sbin/vz_vserver_backup.pl. But instead of using RSYNC it now uses /usr/sausalito/sbin/vzpbackup.sh for the backups (and /usr/sausalito/sbin/vzprestore.sh for the restores)m which takes Snapshots of Containers and saves them in a neat tarball.
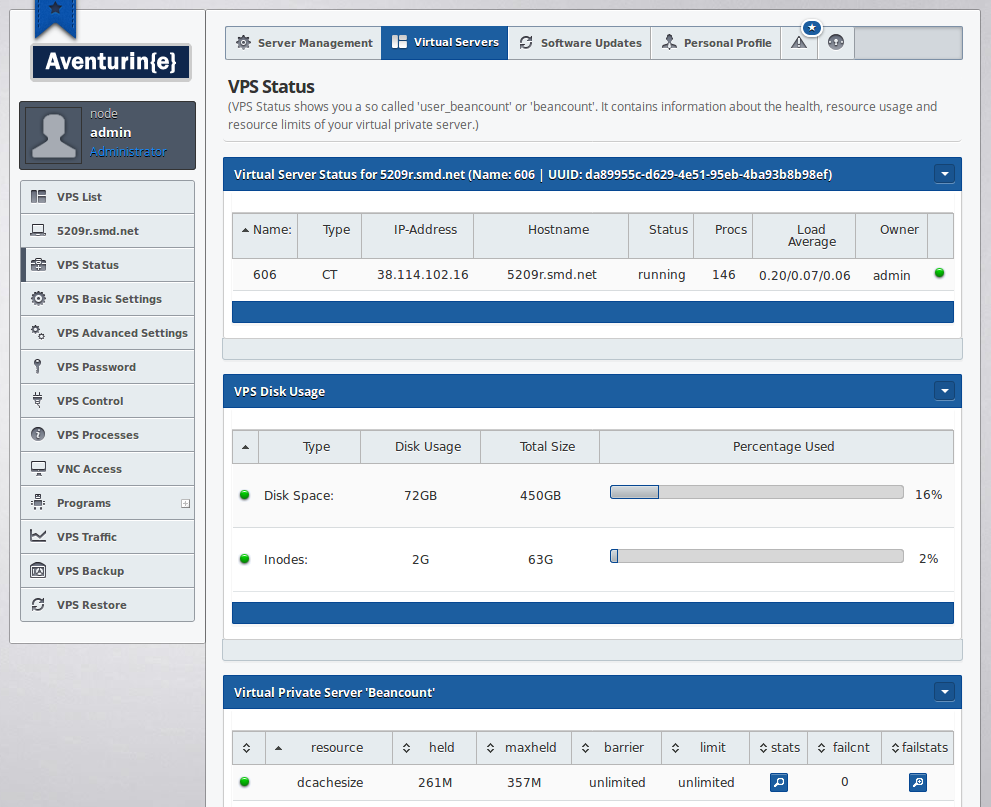
The tarballs have unique names such as vzpbackup_node_da89955c-d629-4e51-95eb-4ba93b8b98ef_5209r.smd.net_20180821-125021.tar
In that particular case it tells us it's a "vzpbackup" taken on server "node". It contains UUID da89955c-d629-4e51-95eb-4ba93b8b98ef with the name of the Container being 5209r.smd.net. And the backup was taken on 21st of August 2018 at 12:50:21. The filearea of said VPS contained 72 GB of data and the resulting (uncompressed) tarball is 74 GB large. We *could* activate compression (pz/bz/pbz/tbz/gz/tgz/xz/txz), but at the cost of high CPU usage on the node itself. The good thing is, though: The snapshot creation is fast and a straight TAR w/o compression is acceptably fast as well without causing any undue load. Plus we can now keep more than one generation of backups, provided you have enough space for them.
Restore of VPS's via the GUI works the same as before. But from the command line you would simply use /usr/sausalito/sbin/vzprestore.sh and point it to the tarball in question. It's as simple as that.
Manually moving VPS's around
Yes, this is a thing. Even with Snapshots (or the neat new 'prlctl clone' command!) there might be cases where you have the need to manually move a VPS around. So you think you did it all right: You created a new UUID for it via 'uuidgen', moved all the files to /vz/private/<new-UUID>/, made the Symlink to the ve.conf file in /etc/vz/conf/ and yet neither 'prlctl list -a' nor 'vzlist -a' will show the VPS.
That's because you now need to use the command 'prlctl register' to teach OpenVZ 7 that there is a Container that it hasn't seen before.
Example Syntax:
prlctl register <path> [--preserve-uuid <yes|no>]prlctl unregister <CT_name>
With these two commands you can tell OpenVZ about a new Container (which it pretty please should manage) or you can tell it to forget about a Container that you manually deleted.
Migrating CTs and VMs between 6109R or OpenVZ 7 nodes
For the purpose of migrating CTs and VMs between Aventurin{e} 6109R nodes (and/or OpenVZ 7 nodes) please use the "prlctl migrate" command. The manual page for that is available here.